
English –
Butter Chicken recipe, is one of the most cherished dishes in Indian cuisine. Its velvety, tomato-based gravy, infused with aromatic spices and tender chicken pieces, has earned it a place in the hearts of food lovers worldwide. Whether it’s a festive occasion, a weekend indulgence, or a comforting midweek treat, Butter Chicken always delivers.
In this blog, I’ll walk you through the step-by-step process of making restaurant-style Butter Chicken at home. You’ll also find tips and tricks to perfect this recipe and variations to suit your preferences.
The Story of Butter Chicken
Originating in Delhi in the 1940s, Butter Chicken was created by the chefs at Moti Mahal restaurant as a way to use leftover tandoori chicken. They combined it with a rich tomato-based sauce, butter, and cream, giving birth to this culinary masterpiece. Since then, it has become a global sensation, loved for its creamy texture and subtle yet flavorful spices.
Ingredients for Butter Chicken
For the Chicken Marinade:
- 500 grams boneless chicken (thighs or breast, cut into bite-sized pieces)
- 1/2 cup yogurt
- 1 tablespoon ginger-garlic paste
- 1 teaspoon turmeric powder
- 1 teaspoon red chili powder (adjust to taste)
- 1 teaspoon garam masala
- 1 tablespoon lemon juice
- Salt to taste
For the Gravy:
- 2 tablespoons butter
- 1 tablespoon oil
- 1 large onion, finely chopped
- 3-4 garlic cloves, minced
- 1-inch piece of ginger, grated
- 3 medium tomatoes, pureed
- 1 teaspoon red chili powder
- 1 teaspoon cumin powder
- 1 teaspoon coriander powder
- 1/2 teaspoon turmeric powder
- 1 teaspoon garam masala
- 1 tablespoon dry fenugreek leaves
- 1/2 cup fresh cream (or 1/4 cup cashew paste for a creamier texture)
- 1/2 teaspoon sugar (optional)
- Salt to taste
For Garnish:
- Fresh coriander leaves, chopped
- A drizzle of fresh cream
Step-by-Step Recipe
Step 1: Marinate the Chicken
- In a mixing bowl, combine yogurt, ginger-garlic paste, turmeric, red chili powder, garam masala, lemon juice, and salt. Mix well.
- Add the chicken pieces, ensuring they are well coated with the marinade.
- Cover the bowl and refrigerate for at least 1 hour, or overnight for deeper flavors.
Step 2: Cook the Chicken
- Heat a grill pan or regular frying pan. Add a little oil and cook the marinated chicken on medium heat until slightly charred and cooked through.
- Alternatively, you can bake the chicken at 200°C (400°F) for 15-20 minutes. Set the cooked chicken aside.
Step 3: Prepare the Gravy
- Saute Aromatics: Heat butter and oil in a pan. Add minced garlic and grated ginger, sautéing until fragrant.
- Cook Onions: Add the finely chopped onions and cook until golden brown.
- Add Tomatoes: Stir in the tomato puree, along with red chili powder, cumin powder, coriander powder, and turmeric powder, dry fenugreek leaves. Cook on medium heat until the oil starts to separate from the sides of the pan.
Step 4: Blend for a Smooth Sauce
- For a silky texture, allow the mixture to cool slightly, then blend it into a smooth puree. Return the sauce to the pan.
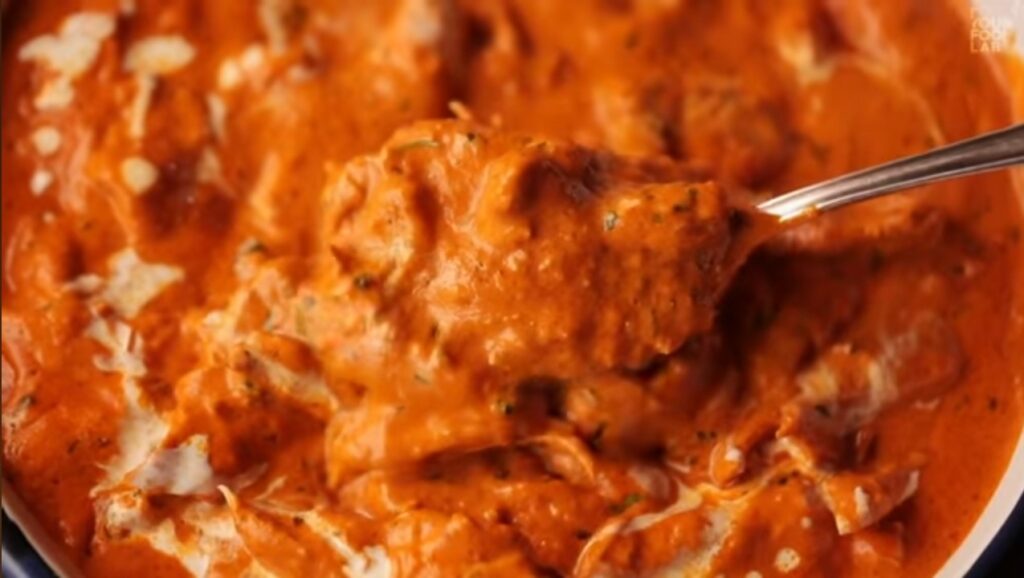
Step 5: Assemble the Butter Chicken
- Simmer the Gravy: Add a little water to adjust the consistency of the gravy. Simmer for 5-7 minutes.
- Add Chicken: Gently fold in the cooked chicken pieces, ensuring they are coated in the sauce.
- Enhance Creaminess: Stir in fresh cream or cashew paste for a rich, velvety texture. Add sugar if desired to balance the tanginess.
- Season to Perfection: Sprinkle garam masala and adjust salt as needed.
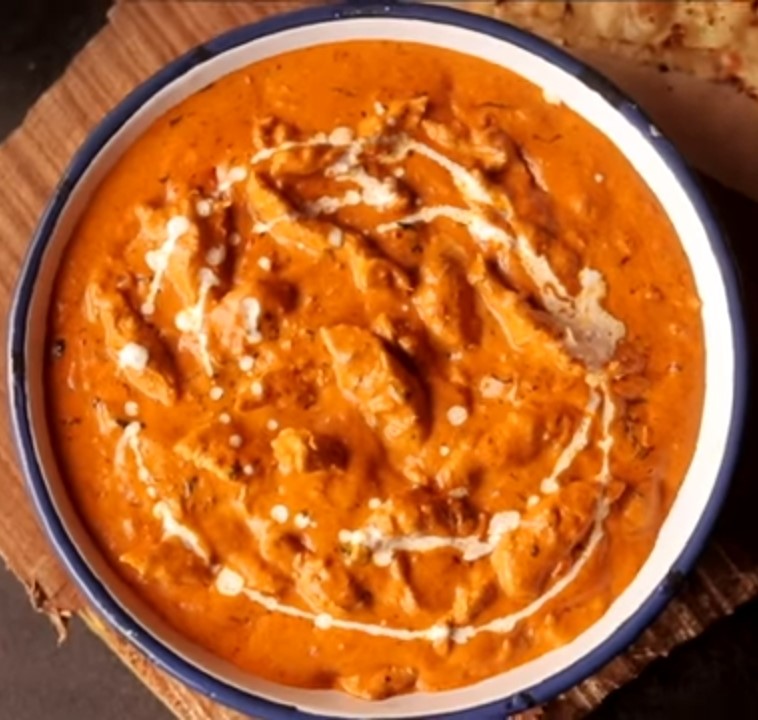
Step 6: Garnish and Serve
- Garnish with a drizzle of fresh cream and chopped coriander leaves.
Serving Suggestions
Butter Chicken is best enjoyed with warm naan, buttered paratha, or steamed basmati rice. For a healthier option, pair it with whole-grain roti or quinoa.
Tips for Perfect Butter Chicken Recipe
- Use Thighs for Juiciness: Chicken thighs are more tender and flavorful than breasts, making them ideal for this dish.
- Marinate for Longer: Overnight marination infuses the chicken with deeper flavors.
- Don’t Skimp on Butter: Butter is the heart of this dish—don’t shy away from it!
- Balance the Flavors: Adjust the spices and sweetness to your taste preferences.
- Blending the Gravy: For a restaurant-style finish, ensure the gravy is blended until smooth.
Variations to Try
- Vegetarian Butter Chicken: Replace chicken with paneer or tofu for a delicious vegetarian version.
- Healthier Option: Use low-fat cream or skip the cream altogether, adding almond or cashew milk for a lighter alternative.
- Spicy Kick: Add green chilies or increase the chili powder for a spicier version.
Conclusion
Butter Chicken recipe is a testament to how simple ingredients can come together to create something extraordinary. The balance of spices, the richness of butter and cream, and the tenderness of chicken make it a dish loved by all.
Try this recipe, and bring the magic of Butter Chicken to your dining table. Don’t forget to share your feedback and variations in the comments below. Happy cooking!
बटर चिकन रेसिपी: एक क्लासिक भारतीय स्वाद
हिंदी –
बटर चिकन रेसिपी, भारतीय व्यंजनों में सबसे प्रिय व्यंजनों में से एक है। इसकी मखमली, टमाटर-आधारित ग्रेवी, सुगंधित मसालों और कोमल चिकन के टुकड़ों के साथ, इसे दुनियाभर के खाने के शौकीनों के दिलों में जगह मिली है। चाहे यह किसी उत्सव का मौका हो, वीकेंड की मस्ती हो, या सप्ताह के बीच में आरामदायक भोजन, बटर चिकन हमेशा खास रहता है।
इस ब्लॉग में, मैं आपको घर पर रेस्टोरेंट-स्टाइल बटर चिकन बनाने की प्रक्रिया को चरण-दर-चरण समझाऊंगी। साथ ही, इस रेसिपी को परफेक्ट बनाने के टिप्स, ट्रिक्स और इसे अपनी पसंद के अनुसार बदलने के सुझाव भी साझा करूंगी।
बटर चिकन की कहानी
1940 के दशक में दिल्ली में मोती महल रेस्तरां के शेफ्स ने तंदूरी चिकन के बचे हुए टुकड़ों को टमाटर-बेस ग्रेवी, मक्खन और क्रीम के साथ मिलाकर बटर चिकन का निर्माण किया। तब से यह व्यंजन एक वैश्विक सनसनी बन गया, अपनी क्रीमी बनावट और सुगंधित मसालों के लिए पसंद किया जाने वाला।
बटर चिकन के लिए सामग्री
चिकन मेरीनेड के लिए:
- 500 ग्राम बोनलेस चिकन (थाई या ब्रेस्ट, छोटे टुकड़ों में काटा हुआ)
- 1/2 कप दही
- 1 टेबलस्पून अदरक-लहसुन का पेस्ट
- 1 टीस्पून हल्दी पाउडर
- 1 टीस्पून लाल मिर्च पाउडर (स्वादानुसार समायोजित करें)
- 1 टीस्पून गरम मसाला
- 1 टेबलस्पून नींबू का रस
- स्वादानुसार नमक
ग्रेवी के लिए:
- 2 टेबलस्पून मक्खन
- 1 टेबलस्पून तेल
- 1 बड़ा प्याज, बारीक कटा हुआ
- 3-4 लहसुन की कलियां, कटी हुई
- 1 इंच अदरक, कद्दूकस किया हुआ
- 3 मध्यम टमाटर, प्यूरी किए हुए
- 1 टीस्पून लाल मिर्च पाउडर
- 1 टीस्पून जीरा पाउडर
- 1 टीस्पून धनिया पाउडर
- 1/2 टीस्पून हल्दी पाउडर
- 1 टीस्पून गरम मसाला
- 1 टेबलस्पून कसूरी मेथी
- 1/2 कप ताजा क्रीम (या काजू का पेस्ट)
- 1/2 टीस्पून चीनी (वैकल्पिक)
- स्वादानुसार नमक
सजावट के लिए:
- ताजा धनिया पत्ती, कटी हुई
- ताजा क्रीम का एक छोटा सा टपकाव
बटर चिकन बनाने की विधि
चरण 1: चिकन मेरीनेट करें
- एक बाउल में दही, अदरक-लहसुन पेस्ट, हल्दी, लाल मिर्च पाउडर, गरम मसाला, नींबू का रस और नमक मिलाएं।
- चिकन के टुकड़ों को इस मिश्रण में डालें और अच्छी तरह से कोट करें।
- बाउल को ढककर कम से कम 1 घंटे के लिए या गहरे स्वाद के लिए रातभर फ्रिज में रखें।
चरण 2: चिकन को पकाएं
- एक ग्रिल पैन या फ्राई पैन गरम करें। थोड़ा तेल डालें और मेरीनेट किए हुए चिकन को मध्यम आंच पर पकाएं जब तक यह हल्का भूरा और पक न जाए।
- वैकल्पिक रूप से, चिकन को 200°C (400°F) पर 15-20 मिनट तक बेक कर सकते हैं।
चरण 3: ग्रेवी तैयार करें
- मक्खन और तेल को एक पैन में गरम करें।
- लहसुन और अदरक डालें और सुगंधित होने तक भूनें।
- कटा हुआ प्याज डालें और इसे सुनहरा भूरा होने तक पकाएं।
- टमाटर प्यूरी, लाल मिर्च पाउडर, जीरा पाउडर, धनिया पाउडर, हल्दी और कसूरी मेथी डालें। मध्यम आंच पर तब तक पकाएं जब तक कि तेल किनारों से अलग न हो जाए।
चरण 4: ग्रेवी को स्मूद बनाएं
मिश्रण को थोड़ा ठंडा होने दें और फिर इसे ब्लेंड करके एक चिकनी प्यूरी बना लें।
चरण 5: बटर चिकन को असेंबल करें
- ग्रेवी में थोड़ा पानी मिलाएं और 5-7 मिनट तक उबालें।
- पकाया हुआ चिकन ग्रेवी में डालें और हल्के हाथ से मिलाएं।
- ताजी क्रीम या काजू का पेस्ट डालें और चीनी मिलाकर स्वाद संतुलित करें।
- गरम मसाला छिड़कें और नमक समायोजित करें।
चरण 6: सजावट और परोसें
- ऊपर से ताजा क्रीम और कटा हुआ धनिया डालकर सजाएं।
- गरमा-गरम परोसें।
परोसने के सुझाव
बटर चिकन को नान, बटर पराठा, या स्टीम्ड बासमती चावल के साथ परोसें। स्वास्थ्यवर्धक विकल्प के लिए इसे होलग्रेन रोटी या क्विनोआ के साथ भी खा सकते हैं।
बटर चिकन रेसिपी को परफेक्ट बनाने के टिप
बटर चिकन रेसिपी इस बात का प्रमाण है कि साधारण सामग्री असाधारण व्यंजन बना सकती है। इसे बनाएं और अपने डाइनिंग टेबल पर इस स्वादिष्ट व्यंजन का आनंद लें।
अपना अनुभव और इस रेसिपी के वेरिएशन कमेंट्स में साझा करें। हैप्पी कुकिंग!
Leave a Reply