
English
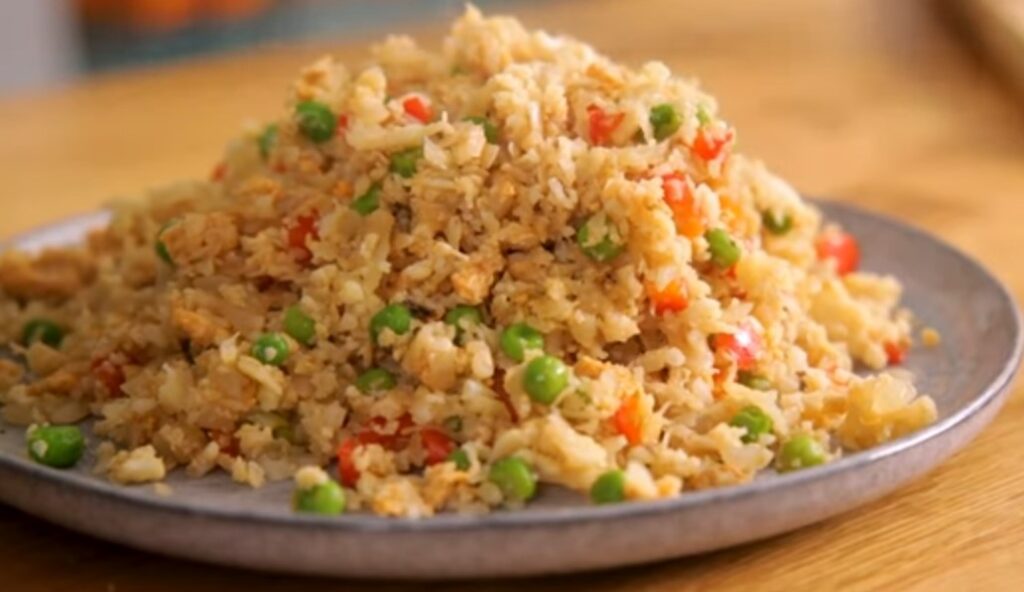
Cauliflower rice stir-fry is the perfect combination of taste, health, and simplicity. Whether you’re looking for a low-carb alternative to regular rice, a quick weekday dinner, or a meal-prep option that keeps you fueled throughout the week, this dish ticks all the boxes. Packed with vibrant vegetables, protein-rich add-ins, and bold seasonings, cauliflower rice stir-fry is as versatile as it is delicious.
In this blog, I’ll walk you through the recipe step-by-step, ensuring you achieve a flavorful and satisfying dish every time.
Why Choose Cauliflower Rice Stir-Fry?
Cauliflower rice is a fantastic substitute for traditional rice, especially for those watching their carb intake. It’s light, gluten-free, and packed with nutrients like fiber, vitamin C, and antioxidants. Stir-frying it with colorful veggies and a touch of your favorite seasonings transforms it into a wholesome meal that’s not just healthy but also incredibly flavorful.
Whether you’re vegan, vegetarian, or following a specific diet like keto or paleo, this dish can be customized to meet your needs.
Ingredients for Cauliflower Rice Stir-Fry
For the Cauliflower Rice:
- 1 medium-sized cauliflower head (or 3 cups of store-bought cauliflower rice)
- 1 tablespoon olive oil
Vegetables:
- 1 medium carrot, diced
- 1 bell pepper (any color), diced
- 1 cup broccoli florets, chopped
- 1/2 cup green peas
- 1/2 cup corn kernels (optional)
- 2–3 green onions, chopped
For the Sauce:
- 2 tablespoons soy sauce (or tamari for a gluten-free option)
- 1 tablespoon sesame oil
- 1 teaspoon grated ginger
- 1 clove garlic, minced
- 1/2 teaspoon chili flakes (optional)
Optional Add-Ins:
- 1/2 cup tofu, scrambled or diced
- 2 eggs, scrambled (if not vegan)
- 1 tablespoon roasted sesame seeds for garnish
Step-by-Step Recipe
Step 1: Prepare the Cauliflower Rice
- If using fresh cauliflower, wash and dry the head thoroughly. Chop it into florets.
- Pulse the florets in a food processor until they resemble small rice grains. Be careful not to over-process them, as they can turn mushy.
- If using store-bought cauliflower rice, ensure it’s fresh or thawed (if frozen) and squeeze out any excess moisture using a clean kitchen towel.
Step 2: Prep the Vegetables
- Chop all the vegetables into bite-sized pieces to ensure even cooking.
- Keep them ready, as stir-frying requires quick cooking at high heat.
Step 3: Make the Sauce
- In a small bowl, mix soy sauce, sesame oil, grated ginger, minced garlic, and chili flakes. Set it aside.
Step 4: Cook the Cauliflower Rice
- Heat 1 tablespoon of oil in a large skillet or wok over medium-high heat.
- Add the cauliflower rice and sauté for 3–5 minutes until slightly tender.
- Remove the cauliflower rice from the pan and set it aside.
Step 5: Stir-Fry the Vegetables
- In the same skillet, add a bit more oil if needed. Start by stir-frying the carrots and broccoli for 2–3 minutes.
- Add the bell peppers, peas, and corn, and stir-fry for another 2 minutes until all the vegetables are cooked but still slightly crisp.
Step 6: Combine and Flavor
- Add the cooked cauliflower rice back into the skillet with the vegetables.
- Pour the sauce over the mixture and toss everything together. Cook for another 2–3 minutes, ensuring the sauce coats all the ingredients evenly.
Step 7: Add Optional Protein
- If using tofu or scrambled eggs, add them to the skillet and mix gently.
Step 8: Garnish and Serve
- Remove the stir-fry from the heat and sprinkle with roasted sesame seeds and chopped green onions.
- Serve hot as a standalone meal or pair it with a light side salad.
Tips for the Best Cauliflower Rice Stir-Fry
- Don’t Overcook the Cauliflower Rice: Overcooked cauliflower rice can turn mushy. Cook it just until tender for the best texture.
- Customize Your Veggies: Feel free to swap in seasonal vegetables or your favorites like zucchini, snap peas, or mushrooms.
- Adjust the Spice Level: Add more chili flakes or a splash of sriracha for a spicier kick.
- Meal Prep Friendly: This stir-fry keeps well in the refrigerator for up to 3 days. Reheat gently in a skillet to maintain the texture.
Health Benefits-
- Low in Carbs: Perfect for keto, paleo, or other low-carb diets.
- Rich in Fiber: Helps with digestion and keeps you feeling full longer.
- Packed with Vitamins: The vegetables provide essential nutrients like vitamin C, vitamin A, and folate.
- Gluten-Free and Dairy-Free: Suitable for various dietary restrictions.
Conclusion
Cauliflower Rice Stir-Fry is not just a healthy meal; it’s a celebration of flavors and textures. Quick to prepare and endlessly adaptable, it’s the kind of dish you’ll want to make again and again.
Give this recipe a try, and let me know how it turned out in the comments below. Did you add your own twist? Share your ideas—I’d love to hear them! Happy cooking!
हिंदी:-
फूलगोभी चावल स्टर-फ्राई: एक सेहतमंद और स्वादिष्ट व्यंजन:-
फूलगोभी चावल स्टर-फ्राई: स्वाद, सेहत और सादगी का परफेक्ट मेल
फूलगोभी चावल स्टर-फ्राई सिर्फ एक व्यंजन नहीं है, यह स्वाद, पोषण और सरलता का आदर्श संयोजन है। चाहे आप नियमित चावल का लो-कार्ब विकल्प ढूंढ रहे हों, एक जल्दी बनने वाला वीकडे डिनर चाहते हों, या ऐसा मील प्रेप कर रहे हों जो पूरे हफ्ते आपको ऊर्जा दे, यह डिश आपकी सभी जरूरतें पूरी करती है। रंग-बिरंगी सब्जियों, प्रोटीन युक्त ऐड-इन्स और बोल्ड सीज़निंग से भरपूर, फूलगोभी चावल स्टर-फ्राई जितना स्वादिष्ट है उतना ही बहुमुखी भी।
इस ब्लॉग में, मैं आपको स्टेप-बाय-स्टेप इस रेसिपी को बनाने का तरीका बताऊंगा, ताकि हर बार यह स्वादिष्ट और संतोषजनक बने।
फूलगोभी चावल स्टर-फ्राई क्यों चुनें?
फूलगोभी चावल पारंपरिक चावल का शानदार विकल्प है, खासकर उन लोगों के लिए जो अपने कार्बोहाइड्रेट का सेवन कम करना चाहते हैं। यह हल्का, ग्लूटेन-फ्री और फाइबर, विटामिन सी और एंटीऑक्सीडेंट जैसे पोषक तत्वों से भरपूर होता है। इसे रंग-बिरंगी सब्जियों और स्वादिष्ट मसालों के साथ स्टर-फ्राई करके एक संपूर्ण भोजन में बदला जा सकता है, जो न केवल सेहतमंद है बल्कि बेहद स्वादिष्ट भी है।
चाहे आप वेगन हों, शाकाहारी हों, या कीटो या पेलियो जैसे किसी विशेष आहार का पालन कर रहे हों, यह व्यंजन आपकी जरूरतों के अनुसार कस्टमाइज़ किया जा सकता है।
फूलगोभी चावल स्टर-फ्राई के लिए सामग्री
फूलगोभी चावल के लिए:
- 1 मध्यम आकार का फूलगोभी का सिर (या 3 कप तैयार फूलगोभी चावल)
- 1 टेबलस्पून जैतून का तेल
सब्जियों के लिए:
- 1 मध्यम गाजर, बारीक कटी हुई
- 1 शिमला मिर्च (किसी भी रंग की), बारीक कटी हुई
- 1 कप ब्रोकोली फ्लोरेट्स, कटे हुए
- 1/2 कप हरे मटर
- 1/2 कप मकई के दाने (वैकल्पिक)
- 2–3 हरे प्याज, कटे हुए
सॉस के लिए:
- 2 टेबलस्पून सोया सॉस (ग्लूटेन-फ्री विकल्प के लिए तामरी)
- 1 टेबलस्पून तिल का तेल
- 1 टीस्पून कद्दूकस किया हुआ अदरक
- 1 लहसुन की कली, बारीक कटी हुई
- 1/2 टीस्पून मिर्च के फ्लेक्स (वैकल्पिक)
वैकल्पिक ऐड-इन्स:
- 1/2 कप टोफू, स्क्रैम्बल्ड या कटे हुए
- 2 अंडे, स्क्रैम्बल्ड (यदि वेगन नहीं हैं)
- 1 टेबलस्पून भुने हुए तिल, गार्निश के लिए
स्टेप-बाय-स्टेप रेसिपी
स्टेप 1: फूलगोभी चावल तैयार करें
- अगर ताजा फूलगोभी का इस्तेमाल कर रहे हैं, तो इसे अच्छी तरह धोकर सुखा लें। इसे छोटे टुकड़ों में काट लें।
- फूलगोभी के टुकड़ों को फूड प्रोसेसर में डालें और तब तक पल्स करें जब तक वे चावल के दानों जैसे छोटे आकार में न आ जाएं। ध्यान रखें कि ज्यादा प्रोसेस न करें, वरना यह गीला हो सकता है।
- अगर आप स्टोर से खरीदा हुआ फूलगोभी चावल इस्तेमाल कर रहे हैं, तो यह सुनिश्चित करें कि यह ताजा हो या अगर जमी हुई हो, तो इसे डीफ्रॉस्ट करके अतिरिक्त नमी को सूखे कपड़े से निकाल दें।
स्टेप 2: सब्जियां तैयार करें
- सभी सब्जियों को छोटे-छोटे टुकड़ों में काट लें, ताकि वे समान रूप से पक सकें।
- जल्दी पकाने के लिए इन्हें तैयार रखें।
स्टेप 3: सॉस बनाएं
- एक छोटे बाउल में सोया सॉस, तिल का तेल, कद्दूकस किया हुआ अदरक, कटा हुआ लहसुन और मिर्च फ्लेक्स मिलाएं। इसे अलग रख दें।
स्टेप 4: फूलगोभी चावल पकाएं
- एक बड़ी कड़ाही या तवे पर 1 टेबलस्पून तेल मध्यम-तेज आंच पर गर्म करें।
- इसमें फूलगोभी चावल डालें और 3–5 मिनट तक भूनें, जब तक यह थोड़ा नरम न हो जाए।
- फूलगोभी चावल को पैन से निकालकर अलग रख दें।
स्टेप 5: सब्जियां स्टर-फ्राई करें
- उसी कड़ाही में, यदि जरूरत हो तो थोड़ा और तेल डालें। पहले गाजर और ब्रोकोली को 2–3 मिनट तक भूनें।
- इसके बाद, शिमला मिर्च, मटर और मकई डालें। इसे 2 मिनट और पकाएं, जब तक सभी सब्जियां पक जाएं लेकिन थोड़ा कुरकुरा भी रहें।
स्टेप 6: मिलाएं और स्वाद दें
- सब्जियों में पका हुआ फूलगोभी चावल डालें।
- ऊपर से तैयार सॉस डालें और हल्के हाथों से मिलाएं। इसे 2–3 मिनट तक पकाएं ताकि सॉस सभी सामग्री में अच्छी तरह मिल जाए।
स्टेप 7: प्रोटीन ऐड करें (वैकल्पिक)
- यदि आप टोफू या स्क्रैम्बल्ड अंडे इस्तेमाल कर रहे हैं, तो इसे पैन में डालें और धीरे-धीरे मिलाएं।
स्टेप 8: गार्निश और सर्व करें
- कड़ाही को आंच से हटाकर इसमें भुने हुए तिल और कटे हुए हरे प्याज डालें।
- इसे गर्मागर्म परोसें, इसे अकेले खाएं या हल्के सलाद के साथ परोसें।
परफेक्ट फूलगोभी चावल स्टर-फ्राई के लिए टिप्स
- अधिक न पकाएं: फूलगोभी चावल को हल्का और नरम बनाने के लिए इसे ज्यादा न पकाएं।
- सब्जियां कस्टमाइज़ करें: आप सीजनल सब्जियां या अपनी पसंद की सब्जियां जैसे जुकिनी, मशरूम या स्नैप मटर का इस्तेमाल कर सकते हैं।
- मसाले एडजस्ट करें: यदि आपको तीखा पसंद है, तो मिर्च फ्लेक्स या श्रीराचा सॉस डालें।
- मील प्रेप फ्रेंडली: यह डिश फ्रिज में 3 दिन तक अच्छी रहती है। इसे हल्की आंच पर दोबारा गर्म करें।
स्वास्थ्य लाभ-
- लो-कार्ब: यह कीटो, पेलियो, या लो-कार्ब आहार के लिए आदर्श है।
- फाइबर से भरपूर: यह पाचन में मदद करता है और आपको लंबे समय तक तृप्त रखता है।
- विटामिन से भरपूर: सब्जियों में विटामिन सी, विटामिन ए और फोलेट जैसे पोषक तत्व होते हैं।
- ग्लूटेन-फ्री और डेयरी-फ्री: यह विभिन्न आहार प्रतिबंधों के लिए उपयुक्त है।
निष्कर्ष
फूलगोभी चावल स्टर-फ्राई न केवल एक सेहतमंद व्यंजन है, बल्कि यह स्वाद और बनावट का उत्सव भी है। इसे जल्दी बनाना और अपनी पसंद के अनुसार ढालना इसे बार-बार बनाने लायक बनाता है।
इस रेसिपी को आजमाएं और मुझे नीचे कमेंट में बताएं कि यह कैसा बना। क्या आपने इसे अपने अंदाज में बनाया? अपने सुझाव साझा करें—खुशहाल खाना बनाने का मजा लें!
Leave a Reply