
English-
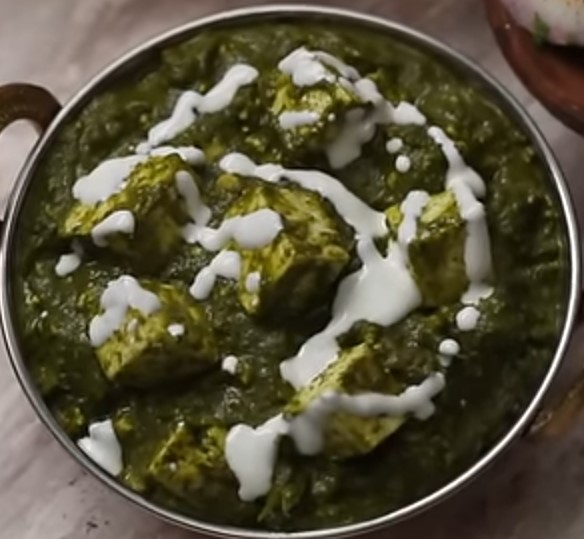
Creamy Spinach Paneer is a beloved North Indian dish, combining the creaminess of paneer with the earthy, vibrant flavors of spinach. This dish is not just delicious but also packed with nutrients, making it a wholesome addition to any meal. Here’s a detailed, step-by-step guide to making a restaurant-style Creamy Spinach Paneer at home.
Ingredients:
For the Spinach Puree:
- 2 bunches of fresh spinach
- 1 green chili (adjust to taste)
- 1-inch piece of ginger
- 3-4 garlic cloves
For the Gravy:
- 200 grams paneer (cut into cubes)
- 1 large onion, finely chopped
- 2 medium tomatoes, pureed
- 4-5 garlic cloves, minced
- 1-inch piece of ginger, grated
- 1 teaspoon cumin seeds
- 1/2 teaspoon turmeric powder
- 1 teaspoon red chili powder
- 1 teaspoon garam masala
- 1/2 cup fresh cream or 1/4 cup cashew paste (optional, for extra creaminess)
- 2 tablespoons oil or ghee
- Salt to taste
Instructions:
Step 1: Prepare the Spinach Puree
- Wash the spinach thoroughly to remove any dirt. Boil water in a large pot and blanch the spinach leaves for 2-3 minutes.
- Drain the spinach and blend it along with green chili, ginger, and garlic into a smooth puree. Set aside.
Step 2: Prepare the Paneer (This step is totally Optional)
If you like, lightly fry the paneer cubes in a bit of ghee until golden. This step enhances their flavor, but you can skip it for a softer texture.
Step 3: Make the Gravy
- Heat oil or ghee in a pan. Add cumin seeds and let them sizzle.
- Add the minced garlic and grated ginger. Saute until fragrant.
- Toss in the finely chopped onions and cook until golden brown.
- Add the tomato puree, turmeric, and red chili powder. Cook the mixture on medium heat until the oil starts separating from the sides. This step ensures a rich, flavorful base.
Step 4: Combine Spinach and Paneer
- Add the spinach puree to the cooked onion-tomato mixture. Stir well and let it simmer for 5-7 minutes.
- Season with garam masala and salt. Mix thoroughly.
- Gently add the paneer cubes into the spinach gravy. Stir carefully to coat them evenly. Let it simmer for another 5 minutes so the flavors meld together.
Step 5: Add the Creamy Element
- To make the dish creamy, stir in fresh cream or cashew paste just before turning off the heat. This step is optional but elevates the dish to a restaurant-quality level.
- Mix well and turn off the heat.
Serving Suggestions:
Creamy Spinach Paneer pairs wonderfully with naan, roti, or steamed basmati rice. Garnish with a swirl of fresh cream and a few drops of ghee for that extra indulgence.
This dish is a delightful way to incorporate spinach into your diet while enjoying the richness of paneer. Try it at home, and watch it become a family favorite!
5 Health Benefits of Spinach
Spinach, commonly known as “palak” in India, is a nutrient-dense green leafy vegetable loved for its versatility and health benefits. Here are five reasons to include spinach in your diet:
1. Rich in Nutrients
Spinach is loaded with essential vitamins and minerals like Vitamin A, Vitamin C, Vitamin K, iron, calcium, and magnesium. These nutrients contribute to better vision, stronger bones, and improved overall health.
2. Supports Heart Health
The potassium and nitrates in spinach help regulate blood pressure and improve blood flow, reducing the risk of heart diseases. Its antioxidants also combat oxidative stress, keeping your heart healthy.
3. Boosts Immunity
Spinach is a powerhouse of Vitamin C and beta-carotene, which are known to strengthen the immune system. Including Spinach in your diet can help your body fight infections and recover faster.
4. Aids Digestion
Packed with dietary fiber, spinach promotes healthy digestion and prevents constipation. It also supports gut health by encouraging the growth of beneficial bacteria.
5. Promotes Healthy Skin and Hair
The high content of antioxidants, Vitamin E, and biotin in spinach nourishes your skin and hair. Regular consumption can give you glowing skin and stronger, shinier hair.
Pro Tip: For maximum benefits, consume spinach in its fresh, lightly cooked, or pureed form, as overcooking can deplete its nutrients.
Start adding Spinach to your meals today and enjoy these amazing health benefits!
Feel free to share your experiences or twists to this recipe in the comments below. Happy cooking!
क्रीमी पालक पनीर रेसिपी
हिंदी-
क्रीमी पालक पनीर रेसिपी
क्रीमी पालक पनीर एक लोकप्रिय उत्तर भारतीय व्यंजन है, जिसमें पनीर की क्रीमी बनावट और पालक के मिट्टी और ताजगी भरे स्वाद का अद्भुत मेल होता है। यह डिश न केवल स्वादिष्ट है, बल्कि पोषक तत्वों से भरपूर भी है, जो इसे किसी भी भोजन में एक पौष्टिक जोड़ बनाती है। यहां घर पर रेस्टोरेंट-स्टाइल क्रीमी पालक पनीर बनाने की विस्तृत, चरण-दर-चरण विधि दी गई है।
सामग्री:
पालक की प्यूरी के लिए:
- 2 गट्ठी ताजा पालक
- 1 हरी मिर्च (स्वादानुसार)
- 1 इंच अदरक का टुकड़ा
- 3-4 लहसुन की कलियां
ग्रेवी के लिए:
- 200 ग्राम पनीर (क्यूब्स में कटा हुआ)
- 1 बड़ा प्याज, बारीक कटा हुआ
- 2 मध्यम टमाटर, प्यूरी किए हुए
- 4-5 लहसुन की कलियां, बारीक कटी हुई
- 1 इंच अदरक का टुकड़ा, कद्दूकस किया हुआ
- 1 चम्मच जीरा
- 1/2 चम्मच हल्दी पाउडर
- 1 चम्मच लाल मिर्च पाउडर
- 1 चम्मच गरम मसाला
- 1/2 कप ताजा क्रीम या 1/4 कप काजू पेस्ट (ऐच्छिक, अधिक क्रीमी बनाने के लिए)
- 2 बड़े चम्मच तेल या घी
- स्वादानुसार नमक
विधि:
चरण 1: पालक की प्यूरी तैयार करें
- पालक को अच्छी तरह धो लें ताकि कोई मिट्टी न रह जाए। एक बड़े बर्तन में पानी उबालें और पालक को 2-3 मिनट के लिए ब्लांच करें।
- पालक को तुरंत ठंडे पानी में डाल दें। यह उसका हरा रंग बनाए रखने में मदद करता है।
- पालक को छान लें और उसे हरी मिर्च, अदरक और लहसुन के साथ ब्लेंड करके मुलायम प्यूरी बना लें। इसे अलग रख दें।
चरण 2: पनीर तैयार करें (ऐच्छिक)
अगर आप चाहें, तो पनीर के टुकड़ों को थोड़े से घी में हल्का सुनहरा होने तक फ्राई कर लें। यह उसका स्वाद बढ़ाता है, लेकिन आप इसे नरम बनावट के लिए छोड़ भी सकते हैं।
चरण 3: ग्रेवी बनाएं
- एक पैन में तेल या घी गरम करें। उसमें जीरा डालें और उसे चटकने दें।
- बारीक कटा हुआ लहसुन और कद्दूकस किया हुआ अदरक डालें। खुशबू आने तक भूनें।
- कटे हुए प्याज डालें और सुनहरा भूरा होने तक पकाएं।
- अब टमाटर प्यूरी, हल्दी और लाल मिर्च पाउडर डालें। मध्यम आंच पर पकाएं जब तक कि मसाले से तेल अलग न हो जाए। यह ग्रेवी को गाढ़ा और स्वादिष्ट बनाता है।
चरण 4: पालक और पनीर को मिलाएं
- तैयार ग्रेवी में पालक की प्यूरी डालें। अच्छी तरह मिलाएं और 5-7 मिनट तक धीमी आंच पर पकने दें।
- इसमें गरम मसाला और स्वादानुसार नमक डालें।
- अब पनीर के टुकड़े ग्रेवी में डालें। धीरे-धीरे मिलाएं ताकि पनीर पर अच्छी तरह ग्रेवी लग जाए। इसे 5 मिनट और पकने दें ताकि सारे स्वाद अच्छी तरह घुल-मिल जाएं।
चरण 5: क्रीमी तत्व जोड़ें
- डिश को क्रीमी बनाने के लिए, गैस बंद करने से ठीक पहले ताजा क्रीम या काजू पेस्ट मिलाएं। यह कदम वैकल्पिक है लेकिन डिश को रेस्टोरेंट-स्टाइल बना देता है।
- अच्छी तरह मिलाएं और गैस बंद कर दें।
परोसने के सुझाव:
क्रीमी पालक पनीर को नान, रोटी या स्टीम्ड बासमती चावल के साथ परोसें। इसे ताजा क्रीम की एक बूंद और थोड़ा घी डालकर सजाएं।
पालक के 5 स्वास्थ्य लाभ
पालक, जिसे भारत में “पालक” कहा जाता है, एक पोषक तत्वों से भरपूर हरी पत्तेदार सब्जी है। इसे अपनी डाइट में शामिल करने के 5 कारण यहां दिए गए हैं:
- पोषक तत्वों से भरपूर
पालक विटामिन ए, विटामिन सी, विटामिन के, आयरन, कैल्शियम और मैग्नीशियम जैसे आवश्यक पोषक तत्वों से भरपूर होता है। यह बेहतर दृष्टि, मजबूत हड्डियों और समग्र स्वास्थ्य को बढ़ावा देता है। - हृदय स्वास्थ्य का समर्थन करता है
पालक में मौजूद पोटैशियम और नाइट्रेट रक्तचाप को नियंत्रित करने और रक्त प्रवाह में सुधार करने में मदद करते हैं, जिससे हृदय रोगों का खतरा कम होता है। - प्रतिरक्षा प्रणाली को मजबूत करता है
पालक में विटामिन सी और बीटा-कैरोटीन की प्रचुरता होती है, जो प्रतिरक्षा प्रणाली को मजबूत बनाते हैं। इसे डाइट में शामिल करने से आपका शरीर संक्रमण से लड़ने में सक्षम होता है। - पाचन में मदद करता है
डाइटरी फाइबर से भरपूर पालक स्वस्थ पाचन को बढ़ावा देता है और कब्ज को रोकता है। यह आंत के स्वास्थ्य को भी बेहतर बनाता है। - स्वस्थ त्वचा और बालों को बढ़ावा देता है
पालक में मौजूद एंटीऑक्सीडेंट, विटामिन ई और बायोटिन त्वचा और बालों को पोषण देते हैं। इसे नियमित रूप से खाने से चमकदार त्वचा और मजबूत, घने बाल मिल सकते हैं।
प्रो टिप: अधिकतम लाभ पाने के लिए पालक को ताजा, हल्का पकाकर या प्यूरी के रूप में सेवन करें, क्योंकि अधिक पकाने से इसके पोषक तत्व नष्ट हो सकते हैं।
पालक को अपने भोजन में शामिल करना शुरू करें और इसके अद्भुत स्वास्थ्य लाभों का आनंद लें!
अपना अनुभव और इस रेसिपी में किए गए बदलाव हमारे साथ साझा करें। खुशहाल कुकिंग!
Leave a Reply