
If you’re familiar with Gujarati cuisine, you’ve likely come across Khandvi—a melt-in-your-mouth snack made from gram flour and yogurt. With its smooth texture, delicate rolls, and bursts of flavor from tempering, Khandvi is a true testament to the culinary artistry of Gujarat.
While it might seem intimidating to prepare, Khandvi is surprisingly simple when you understand its nuances. In this blog, I’ll guide you through every step of making this classic dish, ensuring you get those perfect, soft rolls every time. Whether you’re a seasoned cook or trying it for the first time, this recipe will walk you through the process with ease.
Why Try Khandvi?
Khandvi is not just a snack; it’s an experience. Its subtle, tangy flavor combined with the aromatic tempering of mustard seeds and curry leaves makes it irresistibly delicious. It’s also a great gluten-free option, naturally light on the stomach, and perfect for any time of the day. You can serve it as an appetizer, a tea-time snack, or even as part of a festive spread.
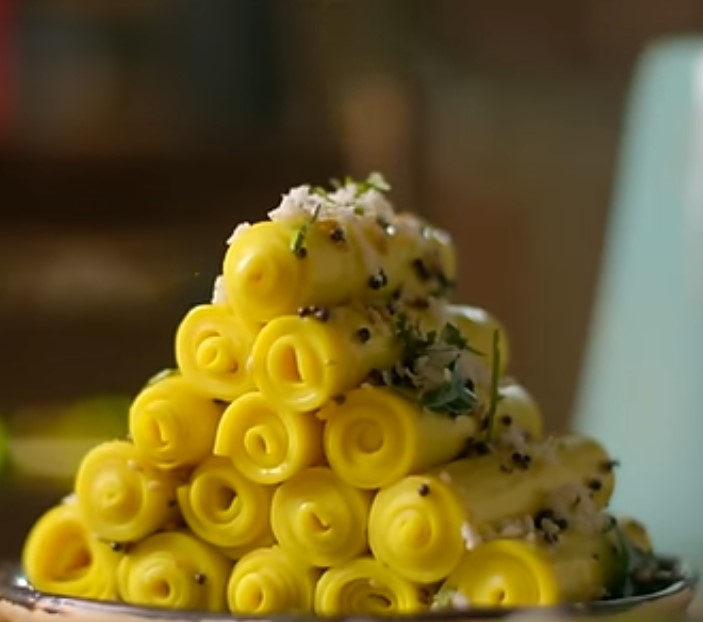
Plus, Khandvi is visually stunning. Those golden-yellow rolls, garnished with fresh coriander and coconut, are a treat for both the eyes and the palate!
Ingredients
For the Khandvi Batter:
- 1 cup gram flour (besan)
- 1 cup plain yogurt (curd)
- 2 cups water
- ½ teaspoon turmeric powder
- 1/2 teaspoon sugar
- 1 teaspoon ginger-green chili paste
- Salt a pinch
For the Tempering:
- 2 tablespoons oil
- 1 teaspoon mustard seeds
- 1-2 chopped green chilli
- 1 teaspoon sesame seeds
- 8–10 curry leaves
- A pinch of asafoetida
For Garnishing:
- Fresh coriander leaves, finely chopped
- Grated fresh coconut
Step-by-Step Recipe
Step 1: Prepare the Batter
- Mix the Ingredients: In a large mixing bowl, combine gram flour, yogurt, water, turmeric powder, ginger-green chili paste, and salt. Whisk thoroughly to ensure there are no lumps. The batter should be smooth and flow easily.
- Cook the Batter: with the help sieve pour (transfer ) the mixture to a non-stick pan or a heavy-bottomed kadai. Cook it on low to medium heat, stirring continuously with a spatula to avoid lumps. Its important to cook only on low flame, to cook properly. low flame and continuous stir is very very important.
- Consistency Check: After about 15–20 minutes ( we have to stir continously for 15-20 minutes ), the batter will thicken into a smooth paste. To check if it’s ready, spread a small amount of batter on a greased plate or the back of a steel plate. If it spreads smoothly and doesn’t stick to your fingers when touched, it’s done.
Step 2: Roll the Khandvi
- Spread the Batter: Quickly spread the cooked batter onto the back of a greased steel plate, marble countertop, or even parchment paper. Use a spatula or the back of a spoon to spread it into a thin, even layer while it’s still hot. once the batter is ready then within 2-3 minutes , we have to spread it on grease surface.
- Cool and Cut: Let the batter cool for 10-15 minutes. Once set, cut it into long strips about 2 inches wide.
- Roll Gently: Starting from one edge, carefully roll the strips into tight, cylindrical shapes. Place the rolls on a serving plate.
Step 3: Tempering
- Prepare the Tempering: Heat oil in a small pan. Add mustard seeds and let them splutter. Then add sesame seeds, curry leaves, and asafoetida. Fry for a few seconds until aromatic.
- Pour Over Rolls: Drizzle the tempering evenly over the prepared Khandvi rolls.
Step 4: Garnish and Serve
Sprinkle finely chopped coriander leaves and grated coconut over the rolls. Serve immediately and enjoy the burst of flavors and textures in every bite!
Tips for Perfect Khandvi
- Timing is Key: The batter sets quickly, so work fast when spreading and rolling. It’s best to prepare all your tools and surfaces before starting.
- Consistency Matters: The batter should be cooked just right—not too thick and not too runny. Overcooking will make it hard to spread, while undercooking will prevent it from setting.
- Use Non-Stick Surfaces: To avoid sticking, grease your plates or surfaces with oil before spreading the batter.
- Practice Makes Perfect: If your first batch isn’t as perfect as you’d like, don’t worry! Like any delicate dish, Khandvi gets easier with practice.
Why You’ll Love This Recipe
Khandvi is not just a dish; it’s a celebration of textures and flavors. The softness of the rolls, the crunch of the tempering, and the freshness of the garnishing make it a truly unique experience. This recipe is perfect for impressing your family and guests, even if you’re new to Gujarati cuisine.
Moreover, it’s a healthy and guilt-free snack. Gram flour is a good source of protein, and the light tempering adds minimal calories.
Conclusion
Making Khandvi at home is a rewarding experience. Once you get the hang of it, you’ll find yourself making it for every occasion—or just because you feel like treating yourself to something special.
So, why not try this recipe today? I’d love to hear how it turned out for you! Share your experiences, tips, or even pictures in the comments below. Happy cooking!
खांडवी –
अगर आप गुजराती व्यंजनों से परिचित हैं, तो आपने खांडवी का नाम ज़रूर सुना होगा—यह बेसन और दही से बना एक ऐसा स्नैक है जो मुँह में जाते ही घुल जाता है। इसकी स्मूथ बनावट, नाज़ुक रोल्स, और तड़के से आने वाला स्वाद इसे गुजरात की पाक कला का एक उत्कृष्ट उदाहरण बनाता है।
शुरुआत में इसे बनाना थोड़ा कठिन लग सकता है, लेकिन खांडवी बनाना बेहद आसान है, अगर आप इसके कुछ बारीकियों को समझ लें। इस ब्लॉग में, मैं आपको इस पारंपरिक डिश को बनाने के हर चरण में मार्गदर्शन दूंगा, ताकि हर बार आपको परफेक्ट और सॉफ्ट रोल्स मिलें। चाहे आप एक अनुभवी कुक हों या पहली बार इसे बना रहे हों, यह रेसिपी आपको सरलता से पूरी प्रक्रिया समझाएगी।
खांडवी क्यों बनाएं?
खांडवी सिर्फ एक स्नैक नहीं है; यह एक अनुभव है। इसका हल्का, खट्टा स्वाद और राई व करी पत्तों के तड़के की महक इसे बेहद लाजवाब बना देती है। यह ग्लूटेन-फ्री विकल्प होने के साथ-साथ पेट के लिए हल्का और दिन के किसी भी समय खाने के लिए एकदम सही है। इसे आप एपेटाइज़र, चाय के समय का स्नैक, या त्योहारों के अवसर पर परोस सकते हैं।
साथ ही, खांडवी दिखने में भी बहुत सुंदर होती है। ये सुनहरे-पीले रोल्स, ताज़ा धनिया और नारियल से सजाए गए, आँखों और स्वाद दोनों के लिए एक खास सौगात हैं!
सामग्री
खांडवी बैटर के लिए:
- 1 कप बेसन
- 1 कप दही
- 2 कप पानी
- ½ चम्मच हल्दी पाउडर
- ½ चम्मच चीनी
- 1 चम्मच अदरक-हरी मिर्च पेस्ट
- स्वादानुसार नमक
तड़के के लिए:
- 2 टेबलस्पून तेल
- 1 चम्मच राई
- 1-2 कटी हुई हरी मिर्च
- 1 चम्मच तिल
- 8–10 करी पत्ते
- चुटकीभर हींग
गार्निशिंग के लिए:
- ताज़ा धनिया पत्ते, बारीक कटे हुए
- ताजा कद्दूकस किया हुआ नारियल
रेसिपी स्टेप बाय स्टेप
चरण 1: बैटर तैयार करें
- सामग्री मिलाएं: एक बड़े मिक्सिंग बाउल में बेसन, दही, पानी, हल्दी पाउडर, अदरक-हरी मिर्च पेस्ट और नमक मिलाएं। इसे अच्छी तरह से फेंटें ताकि कोई गांठ न रह जाए। बैटर बिल्कुल स्मूथ और आसानी से बहने वाला होना चाहिए।
- बैटर पकाएं: इस मिश्रण को एक छन्नी की मदद से एक नॉन-स्टिक पैन या भारी तले की कड़ाही में डालें। इसे धीमी से मध्यम आंच पर लगातार चलाते हुए पकाएं। ध्यान रखें कि इसे हमेशा धीमी आंच पर और बिना रुके चलाना है, ताकि बैटर में गांठ न बनें।
- कंसिस्टेंसी जांचें: लगभग 15–20 मिनट बाद (इस दौरान लगातार चलाते रहना ज़रूरी है), बैटर गाढ़ा होकर चिकने पेस्ट में बदल जाएगा। यह जांचने के लिए कि बैटर तैयार है या नहीं, थोड़ा सा बैटर ग्रीस की हुई प्लेट या स्टील की प्लेट के पीछे फैलाएं। अगर यह आसानी से फैल जाए और उंगलियों से छूने पर चिपके नहीं, तो बैटर तैयार है।
चरण 2: खांडवी रोल करें
- बैटर फैलाएं: पकाए गए बैटर को तुरंत ग्रीस की हुई स्टील प्लेट, मार्बल की सतह, या बटर पेपर पर फैलाएं। इसे एक पतली, समान परत में फैलाने के लिए चम्मच या स्पैटुला का उपयोग करें। बैटर तैयार होते ही 2-3 मिनट के भीतर इसे फैलाना ज़रूरी है।
- ठंडा करें और काटें: बैटर को 10-15 मिनट तक ठंडा होने दें। ठंडा होने के बाद इसे लगभग 2 इंच चौड़ी लंबी स्ट्रिप्स में काट लें।
- गently रोल करें: स्ट्रिप्स के एक किनारे से शुरू करते हुए इन्हें सावधानीपूर्वक टाइट सिलिंडर के आकार में रोल करें। तैयार रोल्स को सर्विंग प्लेट पर रखें।
चरण 3: तड़का लगाएं
- तड़का तैयार करें: एक छोटे पैन में तेल गरम करें। इसमें राई डालें और उसे चटकने दें। फिर तिल, करी पत्ते और हींग डालें। कुछ सेकंड तक महक आने तक भूनें।
- रोल्स पर डालें: तैयार तड़के को खांडवी रोल्स के ऊपर समान रूप से डालें।
चरण 4: गार्निश करें और परोसें
खांडवी को ताजा धनिया और कद्दूकस किए हुए नारियल से सजाएं। इसे तुरंत परोसें और हर बाइट में इसके स्वाद और बनावट का आनंद लें!
परफेक्ट खांडवी के टिप्स
- टाइमिंग महत्वपूर्ण है: बैटर बहुत जल्दी सेट हो जाता है, इसलिए इसे फैलाने और रोल करने में तेजी दिखानी होगी। सभी उपकरण और सतह पहले से तैयार रखें।
- कंसिस्टेंसी का ध्यान रखें: बैटर सही तरीके से पकना चाहिए—न ज़्यादा गाढ़ा, न ज़्यादा पतला। ज़्यादा पकने पर फैलाना मुश्किल हो जाएगा, और कम पकने पर यह सेट नहीं होगा।
- नॉन-स्टिक सतह का उपयोग करें: बैटर को चिपकने से बचाने के लिए प्लेट या सतह पर पहले से तेल लगाएं।
- अभ्यास से परफेक्शन: अगर पहली बार में परफेक्ट खांडवी न बने, तो निराश न हों! यह एक नाजुक डिश है, और अभ्यास से आप इसे बेहतर बना लेंगे।
इस रेसिपी से आप क्यों प्यार करेंगे
खांडवी सिर्फ एक डिश नहीं है; यह स्वाद और बनावट का उत्सव है। इसके नरम रोल्स, तड़के का कुरकुरापन, और गार्निश की ताजगी इसे एक अनोखा अनुभव बनाते हैं। यह रेसिपी आपके परिवार और मेहमानों को प्रभावित करने के लिए परफेक्ट है, चाहे आप गुजराती व्यंजनों में नए हों।
साथ ही, यह एक हेल्दी और गिल्ट-फ्री स्नैक है। बेसन प्रोटीन का अच्छा स्रोत है, और हल्का तड़का इसमें केवल न्यूनतम कैलोरी जोड़ता है।
निष्कर्ष
घर पर खांडवी बनाना एक संतोषजनक अनुभव है। एक बार इसे बनाना सीख जाएं, तो आप हर मौके पर इसे बनाएंगे—या बस खुद को कुछ खास खाने का आनंद देने के लिए।
तो, क्यों न आज ही इस रेसिपी को ट्राई करें? मुझे आपके अनुभव, सुझाव, या तस्वीरें कमेंट्स में जरूर बताएं। हैप्पी कुकिंग!
Leave a Reply